Showing posts with label house. Show all posts

Wednesday, August 20, 2014

Our New (old) Front Door

7 comments:

In the midst of a few other projects I had going on, this one got done first!

IMG_8550

I, like so many out there in blogland, am loving bold front doors that add a pop of color to your entry.  I have had this in the back of my mind for months, but finally took the plunge with a less “in your face” color that I think will transition through the seasons well.  I loved this front door on Emily A. Clark’s house,

(source)

but since we don’t have a brick façade I wanted something a tad more bright.  I started a Pinterest board with all kinds of green door pins to show my husband what it might look like since initially he was a little skeptical.  He ended up being pretty neutral about it after seeing some of them which was great progress so I went ahead and painted it when he went to visit his parents last week.  : )  I had Benjamin Moore’s Avocado color matched in a Behr exterior semi-gloss…with the tiniest bit of black added after I thought it was a little too bright olive-y. 

After the first coat it looked pretty darn awful.  And this next picture is actually after the 2nd coat so it looked slightly better, but still…

EEEEK!!

IMG_8509

And I was really questioning my color choice since it looked positively neon in the sunlight!!!

But after 5 coats, done over the course of 3 days, it now looks like this:

IMG_8551

I think our lion is liking his green surroundings…

IMG_8537

though as always he doesn’t show it.  . 

I found it is difficult to make the green not look flat in pictures.  It looks much more vibrant in person, but oh well!

IMG_8543

And here is a comparison--

Before (this spring when all the plants were new):

IMG_8325

And now:

IMG_8548

I think it looks a lot more welcoming and a lot less stark now!  What a difference a little paint and some lush plants make!

Monday, January 20, 2014

Love the Home You’re With (1)

No comments:

I think there is always the misconception that other people’s homes are cleaner, more organized, prettier, better designed, etc. than your own.  Of course, sometimes that is true (especially if you have little ones like me!  Nothing  stays clean for long around here!) and I think Pinterest and blogs can feed into that feeling too…I don’t take pictures of my orange-from-iron-water shower I’ve been trying to clean this afternoon!!  It is way more fun to take pictures of something I enjoy looking at in my house!! 

But, usually that grass-is-greener outlook is just plain false!  We all have problem areas in our homes, messy closets, cramped hallways, and so on.  Many times we can do something about it if we have the time, energy, and money…but sometimes we can’t.  And it can really steal our joy if we focus on all the bad stuff we can’t change about our home. 

In our previous home, we had this weirdly pink-ish cream palm wallpaper in the dining room and living room. 

IMG_5332

It covered plaster walls that you could tell were in bad shape…in some places if you looked closely you could tell the wall was cracked and uneven behind it.  So, there was no way I was removing the wallpaper and uncovering a kettle of fish that would be potentially very expensive and messy to fix!

For a long time it was my nemesis.  I felt like I could make other parts of the house pretty but not that area.  In the end I painted over the wallpaper in the dining room and it turned out surprisingly well, but I never did end up doing anything with the wallpaper in the living room. 

But really, it was fine!  We lived happily there and I think now that I spent too much time thinking about that dratted wallpaper and not enough time thinking about ways to draw attention away from it.  Because generally if you can’t fix something, there is usually a way to make it look at least a little bit better! 

So, from time to time, I’m going to be featuring ideas from various blogs that showcase a “work with what you’ve got” mentality.  Cause I’m pretty sure none of my readers live in perfect houses.  (If you do, please let me know in the comments!!!)

First off…I saw this post over at Thrifty Décor Chick a while back, and I thought…what genius!! 

[laundrychute43.jpg]

She (Sarah) had an ugly pipe in her closet and she chose to make it pretty and fun!  Go here to see how she did it! 

Also, in the same vein…look at the befores in this laundry from Southern Hospitality, in particular those ducts and pipes that go along the ceilings and walls:

Ohter-end-of-Laundry-room-before.jpg

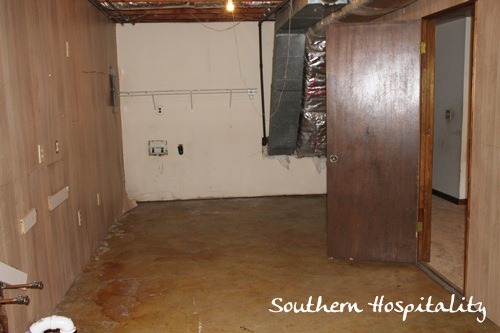
Pretty bad, right??  I would have thought I had to live with that, and cringe every time I did the laundry.  Well, she turned that frown right upside down and made it into a laundry room any of us would enjoy doing the dreaded laundry in.  Just see how those ducts and vents and exposed beams look now!

laundry room side

Now, I know some of it probably cost more than you might have to spend on a laundry space, but the basic changes in this room (like painting the beams and ductwork black and adding that curtain to hide even more uglies) are pretty affordable.  And they make a world of difference!  Find out all Rhoda did to improve this space here. 

And finally, Tanya from Dans Le Townhouse had this pipe-maze and laundry corner that just wasn’t all that pretty. 

(via Dans Le Townhouse)

Since it all had to be readily accessible, she opted to just hide it all in a cheap and easy way.  Go here to see how she did it!! 


I don’t plan to do this every week, but I do plan to make this a regular feature on this blog.  I hope it inspires you (as it does me) to see those flaws in our homes in a new light—something we can change, at least just a little bit!

Thursday, June 27, 2013

A Peek into our Packing Mess…

1 comment:

IMG_6437

Our house looks like a tornado went through it…leaving boxes upon boxes in its wake.  I’m going to be taking a little break from blogging as we move today and settle into our new home. 

IMG_6427

Wednesday, June 5, 2013

Bathroom Reveal

3 comments:

I’m finally ready to share pictures of our 2nd floor bathroom that we remodeled!  (Only a few months after it has been done…oops!  I’m blaming it on this 9 month old and moving.)
So, without furthur ado…
beforeafter
Before:
IMG_7452
After:
bathroomafter  
Before:
IMG_7446
After:
eastwallafter2
As you can see, I haven’t done much decorating in here.  Since our house is on the market, I figured there isn’t much point in personalizing this room much as who knows if the future owners will have the same tastes or not.  Plus, no real point in making nail holes in the freshly painted walls!  So, no window treatments (I would have used bamboo/reed blinds like in the kitchen), no shelves, few pictures, little decor.  We weren’t going to spend a lot of money on fancy finishes since we have no way of knowing if we’ll get that money back out of the house when it sells.  It looks pretty bare, I know!
Here’s a list of what we did with this room:
  • Removed old floral wallpaper (yay, it’s gone!!)
  • Re-tiled shower/tub surround
  • Tore out old blue plastic tile on wall
  • Installed beadboard paneling where plastic tile was, installed trim
  • Removed old medicine cabinet, installed new one
  • Put in new groutable vinyl tile (post to come on this)
  • Repainted and trimmed out old vanity
  • Installed new sink, towel bar, and lighting
We ended up doing it all ourselves (my father-in-law helped with the shower surround) and it took about 2 months.  We worked on it bit by bit rather than doing it all at once, which is why it took so long.  As anyone who has remodeled an old house knows, there are always, always things that come up that you didn’t forsee.  Walls are not square, plumbing is strange, radiators make it difficult to install flooring. 
Although our time in this house is limited, we are enjoying our “new” bathroom for now!  Our 2 year old demands to “go upstairs to the bathroom” whenever he has to go, so we’ll take that as a sign that our whole family is happy with how the bathroom turned out. 
 southwestwall2
 floor1

sinkafter
And as for what we did with that old laundry chute…well, let’s see!
   chute2
A secret storage place for (yep!!) toilet paper!!  I love when design can meet function.  :)
chute3
Within easy reach of the toilet.
 southwallafter2
I love this free printable (from Simple As That) that I printed and popped in a Ribba (Ikea) frame for instant art.  Plus, we’re big G.K. Chesterton fans so this is perfect!
southwallafter
We think our new bathroom matches the rest of our “cottage-y” house so much more than it’s outdated previous self.  I apologize for the lack of photos that show the whole bathroom at once--it is a small space and I don’t have a wide-angle lens for my camera!  The room is much much more pleasant to be in now!

You can read other posts about our bathroom project:
 60's Bathroom Gone Wrong
Bathroom Inspiration
Tiling the Bathroom Shower

Monday, May 27, 2013

Emotions--Me and Moving

2 comments:
Here’s where I’m going to talk about my feelings. 
Mostly my feelings about moving, don’t be too worried!
I’m going to put it right out there:
Moving sucks. 
We’re at a standstill with our lives here at this house.   We know the end is near, our work here is done.  Normally at this time of year I’m busy planting in the yard, scouring the neighborhood plant sales for new varieties and planting vegetable seeds in the garden.  This year I’ve only planted a couple pots because…you can’t dig up the whole garden and take it with you. 
IMG_7636
But it’s not just that.
My heart is in this home. 
Maybe it shouldn’t be.  Maybe it means I’m too attached to things I shouldn’t be attached to.  But I get all emotional thinking of the day we’ll drive away and the house will not be ours anymore.  I brought my past two babies home to this house.  I know my way around it in the dark.  We’ve sweated, cried (well, that’s probably just me), and even bled (mostly my husband) in making this house our own.  I’m pretty invested.
I realize I’m not being forced to leave this house.  We’ve been hoping for the past few years that we could do just what we are doing…selling our home and finding something with a few acres where we can really put down roots and live for the foreseeable future.  I’m excited for that future.  I’m excited to find our next house, to make it our own, to see all the memories we will make there.
But, it’s still tough!  Change is tough!
I know once we actually find another house I’ll feel better about it.  (We haven’t found a new house yet…eeek!)  I think then I’ll be able to start planning our future there more concretely.  Right now it feels like we’re at a dead end instead of  at a new beginning.
I am  glad that I have a house that I can feel that way about.  I wish everyone could have a home they feel this strongly about.  I’m hopeful that soon our “new” house will come on the market and we can buy it and I can start investing in that home and that one day it will feel homey like this home too.
It’s a bittersweet time.  One that will pass and things will look much brighter!!
(I hope I’m not coming off as some sort of first-world complainer—I realize there are those who are homeless, or live in homes they don’t like or are not ideal.  I know there are many many worse housing situations than the one we are currently experiencing!)
Update:  we accepted an offer on our current home a couple weeks ago and we are in the inspection process.  Everything looks promising that we will close the end of next month.  So far we have not put offers on any houses so hopefully soon one will come up that is what we are looking for!

Thursday, May 9, 2013

Moving on

3 comments:
Look what’s in our front yard!
IMG_6245
Yep, we’ve decided to put our home on the market and find our “forever” home.  We love our little 20s two-story but we’re just outgrowing it both space-wise and idea-wise.  For the past few years we have had a five-year plan in mind—this five year plan entailed us selling our home and finding a larger home on a few acres where we could live out our rural roots (both my husband and I grew up out in the boonies) and have space for the kids to build forts and run around and make lots of noise.  Cause that’s what they do!! 
Anyway, with the housing market boom and low interest rates we decided to put it on the market now rather than later and see how things go!  Ugh, I tell you packing and getting a house ready to show with three little kids is tough!!  Seems like as I’m getting one area cleaned I can hear the two-year old making a mess in another room that I just cleaned.  It’s done though…well, I’m sure there is room for improvement, but it is done and ready for showing (actually, we’ve had three showings already!!).
I know, I still have a bathroom to show you (yes, it is done!!), but I’m only now having a little time to take pictures and blog again.  I promise that before we sell the house I’ll make sure to take pictures so you can see the finished product. 
I’ll probably end up writing a post about getting ready to move with 3 little kids underfoot…so if you have any questions you’d like me to answer let me know!  Not that I’m an expert…yet!!

Sunday, March 3, 2013

Tiling the bathroom shower

No comments:
IMG_5791
We have progressed into the tiling phase of our bathroom renovation.  And when I say we, I mean mostly my husband and my father-in-law (I did a little cement-board prep and then I focused on keeping everyone fed while the surround was magically tiled—after doing the tiled backsplash in the kitchen I was more than happy to have tiling elves do this part!). 
While the tile itself is nothing to write home about (I picked out 3X6 subway tile and was going to run them vertically rather than horizontally, then decided the extra $40 was not worth it with this particular project and got 4” square tile instead), it is a vast improvement over what was there before.  (Leaking blue plastic tile.)We plan to put this house on the market in the spring and who knows if the future owner will even like subway tile (though I can’t imagine that!!!). 
IMG_5793
It is so nice to see things moving right along!  And so nice to have help with a project like this. 

Wednesday, February 20, 2013

Bathroom in real time

No comments:
We don’t have a lot of free time around here with 3 little ones, so all remodeling projects go super slowly.  The upstairs bathroom project goes even more slowly because it is right across from the kids’ bedrooms and therefore any work we do has to be done while they are awake as most remodeling produces a fair amount of noise. 
So this is the point we are at.  The ugly, yucky, tear-it-all-down, what-are-we-thinking stage.  Our two year old walked into the bathroom and said “What happened?”  Hmm.  What did happen?
This happened.
IMG_5770
The blue plastic tile is officially gone.  Well, all except for the tile behind the vanity.  So perhaps not officially.  I’m calling it gone though. 
Approximately half of the wallpaper has been scraped off the walls too.  The walls are looking surprisingly good.  I’m not quite sure why the wallpaper was applied in the first place.  I have only found one or two cracks in the plaster so far that will be quite easy to patch.  Certainly nothing that necessitated such a drastic measure as floral wallpaper! 
IMG_5771Whoops.  Overexposed photo alert. 
I’m having a hard time finding an affordable and nice medicine cabinet.  Preferably something under $50…perhaps Craigslist will come through one of these days.  One can always hope!
Hopefully too we’ll start making some more pretty progress soon, though it looks like there will be more demo before we start putting things together. 
Have a happy day!
Liz

Tuesday, February 12, 2013

In-between Kitchen

6 comments:
I showed you pictures of the kitchen the way it was when we bought the house here.  Those were taken before the first round of renovations were done in early 2010.  Clearly, the kitchen needed some serious help.  It was like a cave in there!!!  I avoided it like the plague and wanted to change it immediately, and thankfully my husband’s fresh chocolate chip cookie cravings agreed with me.  We didn’t have the budget or the know-how to do a thorough job of it then, but we knew with a toddler and another little one on the way, that carpet had to go ASAP!!  We bought some tile, tore up the carpet and layers of linoleum underneath, and with the experienced help of family we got the kitchen floor tiled in no time.  At the same time, I had my sisters come over to help me fill the grooves of the old paneling with drywall mud, sand, and paint the walls so they no longer resembled a dark country barroom.  I will have to write about that experience—surely there are others out there who have dark paneling they want to change but don’t have the money or time to completely remove it. 
Here is the kitchen after the tiling and wall facelift!
IMG_4284
Better than before, no?  It is no House Beautiful, but an improvement over the previous dark cavelike atmosphere. 
IMG_4286This makes the room look tilty tilty uncle milty.
Much brighter than before.  That back area used to be so dark!
IMG_4287 
I call this the middle stage of our kitchen.  Better than it was, but still a ways to go (see that ceiling and the old falling apart cabinets?). 
I think the cookie production may have increased slightly after this. 
Liz

Wednesday, February 6, 2013

Bathroom Inspiration

2 comments:

Yesterday I showed you what our main bathroom looks like now.  Today I’m going to show you what I would like our bathroom to look like when we’re done with the renovation. 
Our home was built in the 1920s and has a cottage look to it.  Someone once described it as “storybook” looking, although that was probably a bit generous.  :)  I would like this bathroom to be in keeping with the time period of the house and look as though it has always been authentic to the 20s. 
Although clearly, after yesterday’s pictures, IT HAS NOT!!
Moving on. 

I am planning to go with beadboard in the classic white around the perimeter of the room, going up as high as the blue tile is now. 

We will not be getting a pedestal sink (though I’m tempted to because it would add more visual space to the room) because if we do not have a cabinet there will be no storage in the room for the ugly stuff that needs to be hidden away. 
I don’t know about you, but we live in the very real world of plungers and bath toys and toilet cleaner and extra bags for the trash can in the bathroom.  This isn’t your typical Martha Stewart home.
The medicine cabinet pictured above would be perfect for our bathroom, but as I have been pricing medicine cabinets out, I have come to realize that it is out of our budget for the bathroom.  As in, the budget is extremely tight, and my dream medicine cabinet is not worth it, at least for this house which is probably not our forever house.  I have been scouring craigslist for something that may work that is more affordable. 
Here is the plan for the bathroom:
  • Beadboard wainscoting around the room
  • Re-tile floor and shower/tub surround
  • Scrape wallpaper off walls/ceiling and paint a soft greyish-green
  • Refinish existing cabinets, perhaps adding some height with legs? and new knobs
  • Add new sink in white
  • New faucet in brushed nickel
  • New side sconces in brushed nickel
  • New “floating”glass shelves above the radiator
  • New towel bar near sink
  • Add shelf above the door for more storage
  • New-to-us medicine cabinet (or, if I can’t find one, a mirror)
  • Woven-reed blind for window to add some warmth and a natural element
Should be a piece of cake, right?  :)
In reality, it will probably take months.  Hopefully you aren’t sitting on the edge of your seats, it could be a long wait.  :)
Blessings,
Elizabeth

Tuesday, February 5, 2013

60’s Bathroom Gone Wrong

No comments:
Or, Questionable Design Choices in Blue and Blah
Whilst you are feasting your eyes on our lovely kitchen befores, I thought this might be the perfect opportunity to show you another awful room in the house. 
My kids always say when I feed them pancakes:  “Give me lots of syrup!”.  So I thought that could translate to perhaps nonexistant blog readers saying:  “Give me lots of  pictures of your scariest rooms!”.   There is nothing like pouring bad decor on thick.  So of course I will oblige, because unlike syrup which will cause tooth decay, these photos will only cause mild scarring of the eyes which is easy to remedy by visiting other blogs with gorgeous photos.  Most likely Life In Grace has something lovely going on today. 
Without furthur ado:
 before2
Yes, this is our bathroom.  In the same house that has the paneled kitchen.  We hit the jackpot. 
Let us continue by pointing out its various deficiencies:
before1Oh yes, we also call it our granny or old lady bathroom.  The previous owner was a 90 year old woman and while I am positive she had many great qualities…decorating may not have been one of them.  Ahem.
   Here we have the other side of the room, which you can barely see behind the door.  As you can see, I have already started to remove the wallpaper in some areas.  It looks worse than it is because of the mess, but it is pretty bad just on its own. 
IMG_7446 Note:  I do not have rays of light emanating from my head.  No sainthood here yet. 
Bathroom floorB4
Here we have the original hex tiles that were previously covered with blue carpet (yes, in the bathroom), I suppose to cover the damage to the lovely tiles by a previous plumbing job.  Sadly, they have to be removed. 
IMG_7442
Disclaimer:  I did not clean up the bathroom before taking these pictures;  I had already started to rip off the wallpaper so I didn’t think it would really matter as there would be pieces of wallpaper everywhere as it was. 
Yes, the sink is a shade of baby blue.  It matches the plastic tile (see below) which was I believe the look someone was going for.
 IMG_7437 Behold the blue plastic tiles in all their plasticky glory!
IMG_7448The floral wallpaper extends not only up the walls but also all over the ceiling and into the shower/bath.  More wallpaper removal going on.
Here we have something that I believe is a plus for the room and I have exciting ideas for:IMG_7439
It is a laundry chute door, and although the laundry chute has long been unusable (someone hammered it in in a previous kitchen renovation and then we removed the hammered-in metal when we remodeled), I think I can find a use for this neat little bit of character which is original to the house (complete with glass knob). 
IMG_7458 The mirror/medicine cabinet.  Even with a window in this room, it can be rather dark which is why I am using the flash.  The room is quite small (just 5’X 5’ excluding the shower) and I am standing in the tub to get this picture.  I actually think this medicine cabinet could be neat without the lights on either side, but I think we will take it out anyway and find something that matches the look we are going for.  Don’t worry, I plan to keep the mirror for future projects!
I think that is probably enough for one day.  :) 
And just so you know, this I believe is the single worst room in our house at the moment.  So you probably won’t be subjected to the same level of eye-scarring in any future posts. 
I will go into our plans for this room next!!
Blessings,
Liz

Update...we've finished this room and you can see the reveal here !

Monday, February 4, 2013

In the beginning…

No comments:
There was a kitchen. 

This kitchen.
  IMG_5746
Take a good long look.  Observe the dark paneling, lovely acoustic ceiling, dirty carpet, and junky cabinets. 
And husband walking.  Thankfully that hasn’t changed.  :)
More:
IMG_5748 (Not quite sure what my husband is doing there…look at the paneling instead people!)
Not tired of it yet?  (Our oldest is so little in this picture!!  Awwww…)
IMG_5747
Messes always make the after look better.  Right??? 
IMG_5749

IMG_5750
(Scary back hallway.)
I still can’t believe it looked like that!
These pictures are from 2010.  It is now 2013 and we have done not one but two renovations of this area.  The first was more of a band-aid treatment; the second a total gut job. 
Next post:  how it looked after the first renovation!! 
Baby steps, people.  If I haven’t written more than 1 post in the past 6 months, how do you think I’m going to get all the befores and afters into one post???  :)
Blessings,
Liz